Intro and Powering Down
Difficulty: Relatively Simple
Time Required: 5-10 minutes
Tools needed: Philips screwdriver
This guide was developed to instruct readers on the proper procedures for installing a Serial ATA hard drive into a desktop computer system. It includes step-by-step instructions for the physical installation of the drive into the computer case and properly connecting it into the computer motherboard. Please refer to the documentation included with the hard drive for some of the items listed in this guide.
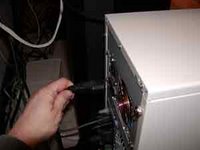
Before working on the inside of any computer system, it is important to power down the computer. Shutdown the computer from the operating system Once the system has safely shutdown, turn off the power to the internal component by flipping the switch on the back of the computer and removing the AC power cord.
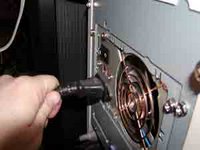
Open Up the Computer Case
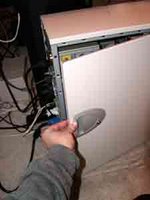
Opening up the computer case will vary depending upon how the case was manufactured. Most new cases will use either a side panel or door while older models require the whole cover be removed. Remove any screws used to fasten the cover to the case and set them aside in a safe place.
Install the Hard Drive to the Drive Cage
Most computer system use a standard drive cage to install a hard drive but some newer cases use a form of tray or rails. Here are the instructions for the two most common methods:
Install the Hard Drive to the Drive Cage
Most computer system use a standard drive cage to install a hard drive but some newer cases use a form of tray or rails. Here are the instructions for the two most common methods:
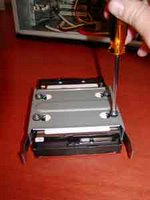
Tray or Rails: Remove the tray or rails from the system and align the tray or rails to match the mounting holes on the drive. Fasten the drive to the tray or rails using screws. Once the drive is affixed, slide the tray or drive into the appropriate slot until it is secure.
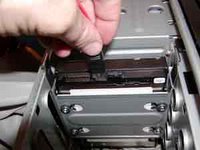
Plug the Serial ATA Cable to the Motherboard
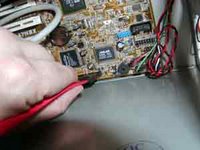
Connect the Serial ATA cable to the Primary or Secondary Serial ATA connector on the motherboard or PCI card. The drive can be plugged into either although if the drive is meant to be used as a boot drive, select the primary channel as this is the first drive to boot between the Serial ATA connectors.
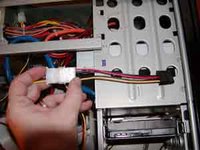
(Optional) Plug in Serial ATA Power Adapter
Depending on the drive's power connectors and the power supply it may be necessary to use a 4-pin to SATA power adapter. If one is required, plug the adapter into the 4-pin Molex power connector from the power supply. Most new power supplies will come with a couple Serial ATA power connectors directly off the power supply

Plug the Power to the Drive
Attach the Serial ATA power connector to the connector on the hard drive. Note that the Serial ATA power connector is larger than the data cable connector.
Close the Computer Case

At this point, all of the interior work for the hard drive is completed. Replace the computer panel or cover to the case and fasten it with the screws that were previously removed when opening the computer case.
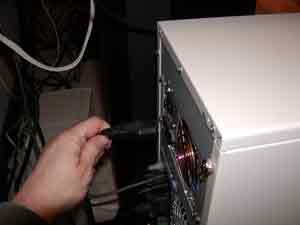
Power Up the Computer
All that is left to do now is power up the computer. Plug the AC power cord back into the computer system and flip the switch on the back to the ON position.
Once these steps are taken, the hard drive should be physically installed into the computer for proper operation. The drive must be formatted for use with the operating system before it can be used. Please consult the documentation that came with your motherboard or computer for additional information.
I admit it took me longer and I had an expert around the place and I practiced on and old case of my son's but I did it in the end.
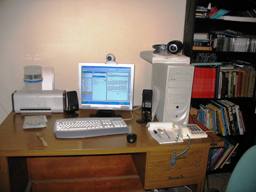
So when it was all over it looked it's normal self again Phew.


 Intro and Powering Down
Difficulty: Relatively Simple
Time Required: 5-10 minutes
Tools needed: Philips screwdriver
This guide was developed to instruct readers on the proper procedures for installing a Serial ATA hard drive into a desktop computer system. It includes step-by-step instructions for the physical installation of the drive into the computer case and properly connecting it into the computer motherboard. Please refer to the documentation included with the hard drive for some of the items listed in this guide.
Before working on the inside of any computer system, it is important to power down the computer. Shutdown the computer from the operating system Once the system has safely shutdown, turn off the power to the internal component by flipping the switch on the back of the computer and removing the AC power cord.
Intro and Powering Down
Difficulty: Relatively Simple
Time Required: 5-10 minutes
Tools needed: Philips screwdriver
This guide was developed to instruct readers on the proper procedures for installing a Serial ATA hard drive into a desktop computer system. It includes step-by-step instructions for the physical installation of the drive into the computer case and properly connecting it into the computer motherboard. Please refer to the documentation included with the hard drive for some of the items listed in this guide.
Before working on the inside of any computer system, it is important to power down the computer. Shutdown the computer from the operating system Once the system has safely shutdown, turn off the power to the internal component by flipping the switch on the back of the computer and removing the AC power cord.
 Open Up the Computer Case
Opening up the computer case will vary depending upon how the case was manufactured. Most new cases will use either a side panel or door while older models require the whole cover be removed. Remove any screws used to fasten the cover to the case and set them aside in a safe place.
Open Up the Computer Case
Opening up the computer case will vary depending upon how the case was manufactured. Most new cases will use either a side panel or door while older models require the whole cover be removed. Remove any screws used to fasten the cover to the case and set them aside in a safe place.
 Install the Hard Drive to the Drive Cage
Most computer system use a standard drive cage to install a hard drive but some newer cases use a form of tray or rails. Here are the instructions for the two most common methods:
Install the Hard Drive to the Drive Cage
Most computer system use a standard drive cage to install a hard drive but some newer cases use a form of tray or rails. Here are the instructions for the two most common methods:
Install the Hard Drive to the Drive Cage
Most computer system use a standard drive cage to install a hard drive but some newer cases use a form of tray or rails. Here are the instructions for the two most common methods:
Install the Hard Drive to the Drive Cage
Most computer system use a standard drive cage to install a hard drive but some newer cases use a form of tray or rails. Here are the instructions for the two most common methods:
 Tray or Rails: Remove the tray or rails from the system and align the tray or rails to match the mounting holes on the drive. Fasten the drive to the tray or rails using screws. Once the drive is affixed, slide the tray or drive into the appropriate slot until it is secure.
 Plug the Serial ATA Cable to the Motherboard
Connect the Serial ATA cable to the Primary or Secondary Serial ATA connector on the motherboard or PCI card. The drive can be plugged into either although if the drive is meant to be used as a boot drive, select the primary channel as this is the first drive to boot between the Serial ATA connectors.
(Optional) Plug in Serial ATA Power Adapter
Depending on the drive's power connectors and the power supply it may be necessary to use a 4-pin to SATA power adapter. If one is required, plug the adapter into the 4-pin Molex power connector from the power supply. Most new power supplies will come with a couple Serial ATA power connectors directly off the power supply
Plug the Serial ATA Cable to the Motherboard
Connect the Serial ATA cable to the Primary or Secondary Serial ATA connector on the motherboard or PCI card. The drive can be plugged into either although if the drive is meant to be used as a boot drive, select the primary channel as this is the first drive to boot between the Serial ATA connectors.
(Optional) Plug in Serial ATA Power Adapter
Depending on the drive's power connectors and the power supply it may be necessary to use a 4-pin to SATA power adapter. If one is required, plug the adapter into the 4-pin Molex power connector from the power supply. Most new power supplies will come with a couple Serial ATA power connectors directly off the power supply

 Plug the Power to the Drive
Attach the Serial ATA power connector to the connector on the hard drive. Note that the Serial ATA power connector is larger than the data cable connector.
Close the Computer Case
Plug the Power to the Drive
Attach the Serial ATA power connector to the connector on the hard drive. Note that the Serial ATA power connector is larger than the data cable connector.
Close the Computer Case

 At this point, all of the interior work for the hard drive is completed. Replace the computer panel or cover to the case and fasten it with the screws that were previously removed when opening the computer case.
Power Up the Computer
All that is left to do now is power up the computer. Plug the AC power cord back into the computer system and flip the switch on the back to the ON position.
Once these steps are taken, the hard drive should be physically installed into the computer for proper operation. The drive must be formatted for use with the operating system before it can be used. Please consult the documentation that came with your motherboard or computer for additional information.
I admit it took me longer and I had an expert around the place and I practiced on and old case of my son's but I did it in the end.
So when it was all over it looked it's normal self again Phew.
At this point, all of the interior work for the hard drive is completed. Replace the computer panel or cover to the case and fasten it with the screws that were previously removed when opening the computer case.
Power Up the Computer
All that is left to do now is power up the computer. Plug the AC power cord back into the computer system and flip the switch on the back to the ON position.
Once these steps are taken, the hard drive should be physically installed into the computer for proper operation. The drive must be formatted for use with the operating system before it can be used. Please consult the documentation that came with your motherboard or computer for additional information.
I admit it took me longer and I had an expert around the place and I practiced on and old case of my son's but I did it in the end.
So when it was all over it looked it's normal self again Phew.


No comments:
Post a Comment